


How to Build a Concrete Shed Base
Published: 10/05/2021
If you’re planning a new garden shed, log cabin, summerhouse or even a Tiger Modular garden room, one of the first things you’ll need to think about is the foundation. A strong, level base is essential, and for many garden buildings, a concrete shed base is the most reliable choice.
This guide explains how to build a concrete shed base, covering everything from why concrete is a great option to a detailed step-by-step method. Whether you’re learning how to lay a concrete shed base, how to make a concrete base, or just want a simple breakdown of the process, you’ll find everything you need here.
Why Lay a Concrete Base?
A concrete base for sheds and garden buildings is one of the most popular options because of its strength, stability, and longevity. Here’s why:
Structural Integrity
Concrete provides a tough and durable foundation, perfect for any size garden building. From lightweight sheds to large log cabins or garden rooms, a concrete base delivers the strength and reliability needed to support heavier structures.
Low Maintenance
Once built, a concrete base requires very little upkeep. Unlike timber bases that may need occasional treatment, a concrete foundation can last decades with minimal maintenance.
Suitable for All Storage Needs
If you’re storing garden machinery, tools, or items that might carry moisture, a concrete surface is ideal. It won’t warp or rot, and it provides a dry, secure platform.
Weather Resistance
Concrete withstands the elements well, making it a great long-term solution even in wet or windy conditions.
Versatility
This isn’t just about sheds – a concrete base is also a solid option for summerhouses, log cabins, and garden rooms.
The Steps to Building a Concrete Shed Base
To help you jump straight to the section you need, here’s an overview of the steps:
- Step 1: Calculate the Amounts & Costs
- Step 2: Choosing the Location for Your Garden Building Base
- Step 3: Mark & Clear Area
- Step 4: Lay Sub Base
- Step 5: Build a Shed Frame
- Step 6: Adding a Membrane
- Step 7: Lay the Concrete
- Step 8: Covering the Base
- Step 9: Build Your Garden Shed or Building
What Do I Need for a Concrete Shed Base?
Here’s everything you’ll need to get started:
- Ballast, cement and water (or ready-mix concrete)
- Compacted hardcore or brick rubble
- Earth rammer
- Cement/concrete mixer or mixing tray
- Tape measure
- Spirit level or set square
- Shovel
- Rake
- Tamping board
- Edging trowel
- Wheelbarrow
- Plastic sheet and wooden supports
- Breeze blocks or bricks
- Saw
- Pegs and string
Once you’ve gathered your tools and materials, you’re ready to begin.
Step 1: Calculate the Amounts & Costs

Does Your Shed Base Need to Be Bigger Than the Shed?
Yes, always. Your base should extend at least 30–40cm beyond the footprint of your shed or garden building on each side. This gives stability and allows for easier access.
How Thick Should Your Concrete Base Be?
For most sheds, a thickness of at least 75mm (3 inches) is recommended. Heavier buildings like log cabins and garden rooms will need 100–150mm.
How to Calculate the Volume of Concrete You’ll Need

Use this simple formula:
Length × Width × Depth = Volume (in m³)
Example: For a 9ft × 7ft shed (2.74m × 2.13m) with a 75mm depth (0.075m):
2.74 × 2.13 × 0.075 = 0.44m³
Always round up and allow extra – around 10–15% more, to make sure you don’t run short.
Step 2: Choosing the Location for Your Garden Building Base

Planning Permission
Most sheds and garden buildings don’t require planning permission but check local rules before you start. Check out our planning permission guide.
Why Location Matters

Once set, a concrete base can’t be moved, so choose wisely. The right position will protect your shed from damage and make it more practical to use.
Checklist for Garden Building Placement
- Level Ground – ensures the structure is stable and easy to assemble
- Avoid Wet Areas – prevents moisture damage
- Distance from Trees – stops shade, falling leaves, damage to roof felt by hanging or fallen branches and root disruption
- Sunlight / Shade Balance – enough light inside, but not so much heat that the building overheats

For advice on sloped gardens, see our guide on how to build a shed base on uneven ground.

Step 3: Mark & Clear Area
- Remove any grass, weeds, or vegetation.
- Mark out your area with pegs and string.
- Excavate to around 150mm depth to allow for the sub-base and concrete layers.

Step 4: Lay Sub Base
The sub-base provides stability beneath the concrete. MOT Type 1 hardcore is the best material for this.
- Fill around half the depth of the excavated area (approx. 75mm).
- Compact the hardcore using an earth rammer or plate compactor until firm and level.
- This prevents future movement or cracking of the concrete.
Step 5: Build a Shed Frame
Your frame will hold the wet concrete in place while it sets.
- Use treated timber rails around 100mm thick.
- Ensure the inner dimensions match your planned base size.
- Check with a spirit level that the frame is square and even.
Step 6: Adding a Membrane
For extra protection, add a damp-proof membrane (DPM).
- Lay heavy-duty plastic sheeting over the sub-base.
- This prevents moisture rising into the shed and extends the lifespan of both the concrete and your building.
- Overlap sheets by at least 150mm and tape them together.
Step 7: Lay the Concrete
- Mix or pour ready-mix concrete into the frame.
- Spread evenly, working into corners.
- Compact using a tamping board.
- Level the surface with the board and check using a spirit level.
Step 8: Covering the Base
- Smooth the edges with an edging trowel.
- Cover the surface with plastic sheeting to prevent cracks while drying.
- Allow at least 48 hours before building, and longer in colder weather.
Step 9: Build Your Garden Shed or Building
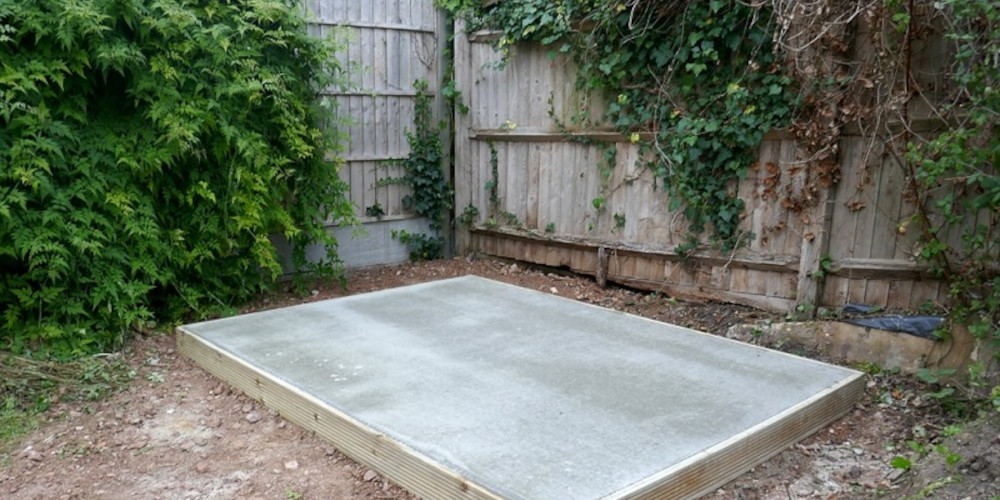
Once your base is set and solid, you’re ready for the exciting part which is assembling your shed, summerhouse, log cabin, or garden room. A well-laid base gives your structure the best possible start for years of use.

Final Thoughts
Learning how to make a concrete shed base is one of the most important steps in any garden building project. By following these steps, you’ll create a foundation that’s strong, reliable, and long-lasting.
If you’d like to explore alternative methods, check out our guide on how to build a wooden shed base.


