How to Felt a Shed Roof
Published: 13/10/2023

Roof felt, a versatile and widely used roofing material, offers unparalleled protection against the elements and pesky insects. Whether it's damp, snow, wind, rain, or pests, felt has got you covered. It serves as a reliable underlay for pitched roofs, complementing roof tiles or slates. Additionally, it can be the primary roof covering for flat roofs, sheds, garages, and other outbuildings. Today, the most prevalent form of roof felt is crafted from bitumen, a tar-like substance derived from crude oil. This durable material, combined with a fibrous membrane and a layer of sand or fine gravel, ensures both functionality and aesthetic appeal. With a lifespan of 10-20 years, properly maintained felt roofs offer exceptional value for money. While occasional repairs may be necessary, the affordability and popularity of felt make it a top choice for DIY enthusiasts.
Roofing felt offers unbeatable value, providing solid durability and longevity at an affordable price. Perfect for small projects like garden sheds, it's the smart choice for homeowners. With an average cost of £50 per square meter, you can secure a durable and reliable roof on a standard size shed between £50-600. Don't forget to consider additional expenses for labour and tools.
Not only is roofing felt budget-friendly, but it's also incredibly lightweight. This makes it ideal for lightweight timber sheds and structures that can't handle heavier materials. Say goodbye to worries about structural integrity and hello to a hassle-free installation process.
Speaking of installation, roofing felt couldn't be easier to handle. With convenient rolls and simple application methods, you can complete the job in no time. Whether you're a professional or a DIY enthusiast, roofing felt is your go-to option.
While roofing felt is highly durable, it's not immune to damage. But fear not, repairs are a breeze. Patching up cracks or holes is a simple task, unlike other materials that require complex replacements. Save time and money with roofing felt.
Versatility is another key advantage of roofing felt. Unlike slates or roofing sheets, it can be easily cut and shaped to fit any roof design. No matter how complex your structure, if you have enough felt, you're good to go.
But that's not all. Felting a shed roof is a breeze, even for those homeowners who fancy themselves as a bit of a DIY expert. You don't need to be a professional to get the job done right. With roof felt, you can take matters into your own hands and ensure your garden shed remains safe and secure.
Calculating how much roof felt you need…
- For a flat roof - multiply the roof length by the width, and voila! For flat roofs with four sides, it's a breeze. But fear not, even if your design is more intricate, break your shed down into sections, calculate their areas, and add them up!
- For an apex roof - measure the roofs length and multiple it by the slope height. This will give you the area of one side, so simply multiple this figure by two for the full area.
The tools you’ll need…
- Tape measure
- Stanley knife
- Claw hammer
- Galvanised clout nails
- High-grade roof felt
How to Felt a Pent Roof
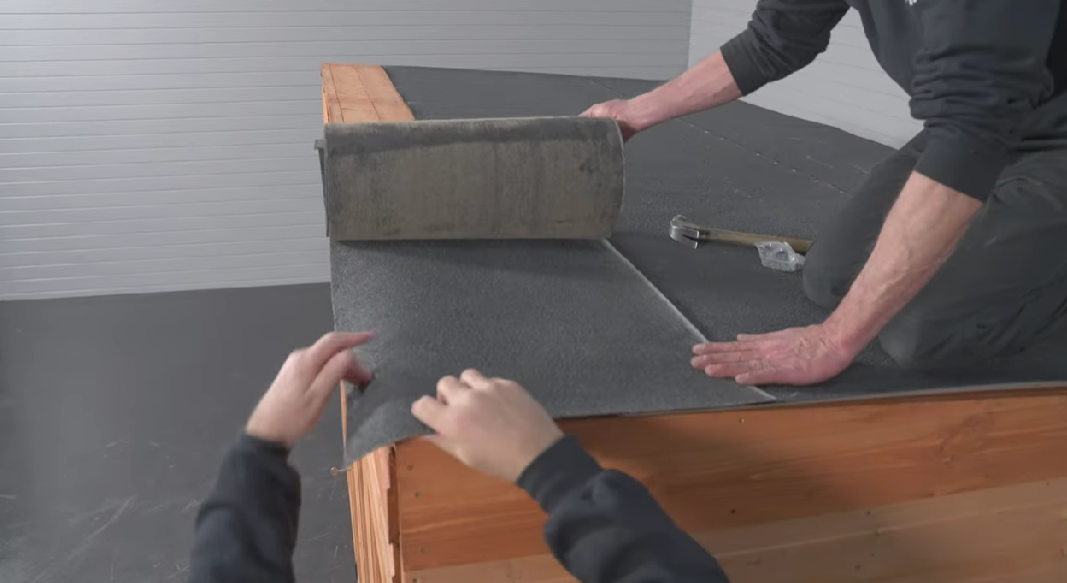
- Roll felt out onto a clean flat surface 30 minutes before you need it so it has a chance to flatten out.
- Measure length of roof and allow 35mm overhang at each end. Cut each strip of felt to size. Use a straight edge to guide cutting.
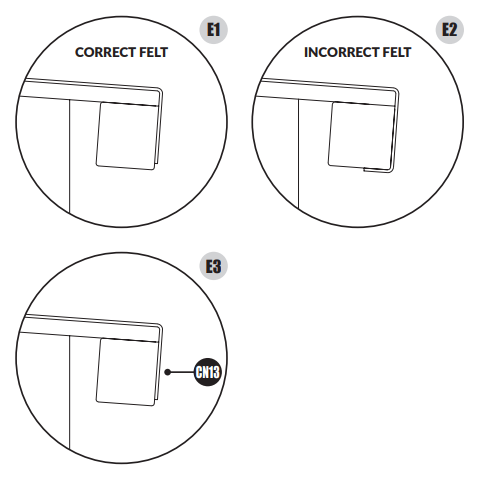
- Roll cut felt piece along low side of roof, Section 1, leaving sufficient overhang to fold down onto roof edge. Do not fold underneath roof. (Detail E1 & E2)
- Once felt is rolled out, fix felt to roof boards using clout nails at each end, making sure the felt is straight. Fix to roof skirting at approx. 100mm intervals. (Detail E3)
- Ensure the felt is tight, then secure the top side of felt using clout nails at approx. 100mm intervals.
- Repeat for remaining felt, working from the low side of roof to the high side, overlapping the felt by 75mm until the roof is fully covered.
- Fold the overhanging felt at ends under roof panel and tack in place.
- Fit bargeboards to the roof panels, trapping overhanging end of the felt in between the roof panel and bargeboard.
.png)

Check out our handy ‘How to build a Pent Shed’ installation video and skip to the part where we show you how to felt a pent roof Step by Step.
How to Felt an Apex Roof
- Roll felt out onto a clean flat surface 30 minutes before you need it so it has a chance to flatten out.
- Measure length of roof and allow 35mm overhang at each end. Cut each strip of felt to size. Use a straight edge to guide cutting.
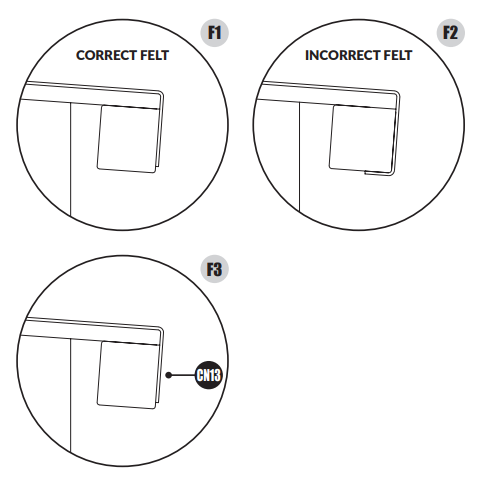
- Roll cut felt piece along low side of roof, Section 1, leaving sufficient overhang to fold down onto roof edge. Do not fold underneath roof. (Detail F1 & F2)
- Once felt is rolled out, fix felt to roof boards using clout nails at each end, making sure the felt is straight. Fix to roof skirting at approx. 100mm intervals. (Detail F3)
- Ensure the felt is tight, then secure the top side of felt using clout nails at approx. 100mm intervals.
- Repeat for remaining felt, working from the low side of roof to the high side, overlapping the felt by 75mm until the roof is fully covered.
- Fold the overhanging felt at ends under roof panel and tack in place.
- Fit bargeboards to the roof panels, trapping overhanging end of the felt in between the roof panel and bargeboard.
.png)

Check out our handy ‘How to build an Apex Shed’ installation video and skip to the part where we show you how to felt an apex roof Step by Step.
So why wait? Don't let wind-driven rain and unwanted pests wreak havoc on your property any longer. Invest in roof felt today and experience the peace of mind that comes with knowing your shed is protected. With its affordability, ease of installation, and proven track record, roof felt is the ultimate choice for homeowners who value quality and reliability.
Find your perfect space with Tiger Sheds. Choose from hundreds of innovative garden building designs or use our bespoke design service. We offer the Tiger 20 Year Guarantee for your peace of mind.


